Measuring instruments and measurement systems are at the core of any manufacturing industry. The goal of every organisation that strives to deliver a consistent and good-quality product, is to reduce variations in the process. Measurement systems play a vital role in correctly identifying variations and help to control them.
In today’s blog, we will discuss some common concepts of measurement systems.
TRUE VALUE AND REFERENCE VALUE
To analyse a measurement system, we must know the true value of the characteristic we are measuring. The true value is the actual value of a measurement. However, because of variations in the measuring instrument, environment, procedure, operator, etc., it is not possible to find the true value.
In the absence of a true value, we use what is known as a reference value. The reference value is a measurement taken under controlled conditions. So we use the best calibrated instrument with the least error, the most experienced operator, and carry out the measurements in a controlled environment. The measurement we get in this way is called the reference value.
Resolution/Discrimination/Least Count
Known alternatively by the above three names, this is the smallest readable unit of an instrument. Selecting an instrument with the correct resolution is important for you to get the correct result of any measurement.

For example, we have to measure a characteristic with the following range: 100 ± 0.05 mm (99.95 – 100.05).
The tolerance range is 100.05 – 99.95 = 0.1.
The resolution of the instrument therefore must be = Range of tolerance/10 =
0.01mm.
PRECISION AND ACCURACY
Precision and accuracy are two parameters that are most discussed when we speak about the capability of any measuring instrument or system. While the QMS standard ISO13485 doesn’t specifically mention precision and accuracy, we find a mention in the US FDA’s QSR, 21CFR 820.

Accuracy and precision indicate the inherent variation in a measuring system.
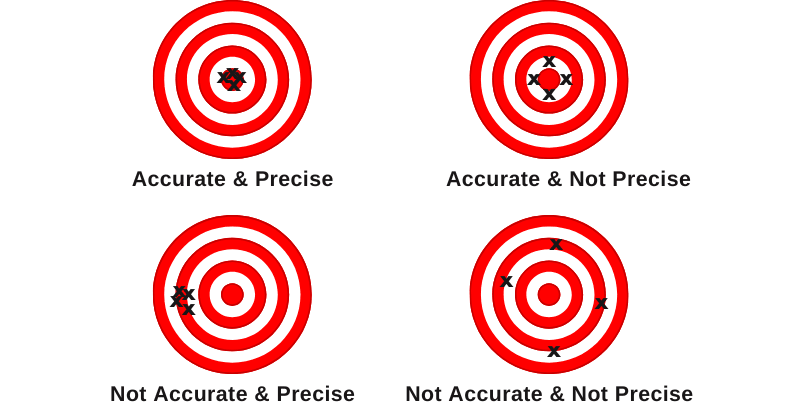
ACCURACY of a measurement instrument shows how close the measurements taken by the instrument are to the ‘true value’ or an accepted reference value.
PRECISION, on the other hand, means how close the repeated measurements taken by the same instrument of the same characteristic are.
The figure below shows the difference between accuracy and precision. The centre of the dartboard is the ‘true value’. In the leftmost figure, the points are near the true value and also close to each other. So, the points are both accurate and precise. The figure in the bottom left corner shows that the points are close to one another but far away from the true value. So, the points are not accurate, but they are precise.
ACCURACY & PRECISION
MEASUREMENTS OF ACCURACY
Accuracy has three measurements: Bias, Linearity and Stability


BIAS is the difference between the observed average of the measurements and the reference value.
Below are readings taken of a certain dimension whose reference value is 100mm.
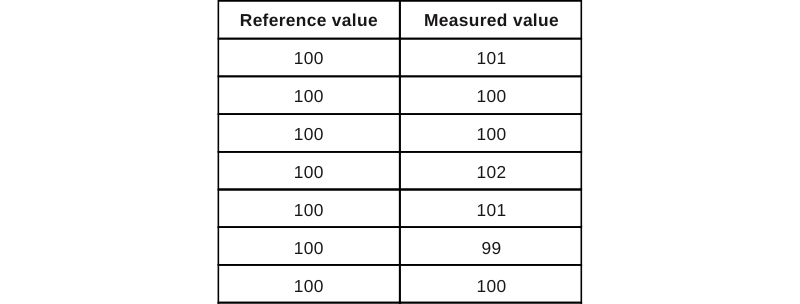
Average of the seven readings is 100.428
The bias of the instrument is therefore = 100.428-100 = 0.428mm
Why is there bias in the instrument? The most important reason could be that the instrument is not calibrated or wrongly calibrated. It might also happen due to operator error—how the operator is handling the instrument or reading the instrument (parallax error).
LINEARITY measures the bias across the operating range of an instrument. If the bias changes across the operating range of the instrument, then the instrument has a problem of linearity.
Let’s look at an instrument with an operating range of 0 to 200 mm. The bias of the instrument at different reference values is given in the below table.

We see here that the bias changes for different reference values. The measuring instrument, therefore, has a linearity problem.
Linearity could result from a wrongly calibrated instrument or an instrument that is not calibrated. It can also happen due to the instrument's wearing out or not being designed for the complete measurement range.
STABILITY measures the bias over time. If the bias changes over time, then the instrument has a stability issue.
This can happen due to wear and tear on the instrument due to ageing, long durations between calibrations, or poor quality.

MEASUREMENT OF PRECISION

REPEATIBILITY is the variation in the measurement obtained with the same measuring instrument when used repeatedly by the same operator. The part, operator, measurement procedure, and environment remain constant for repeatability. This variation is within the system and is attributed to the measurement system. This may be caused by variation within the part measured, procedure, environment, or the instrument. Repeatability is also known as equipment variation, or EV.

REPRODUCIBILITY is the variation in the average of measurements obtained by different operators using the same measuring instrument. This variation may be due to differences in the experience and handling of the instrument among operators. Reproducibility is also known as appraiser variation, or AV.

Understanding an instrument’s accuracy and precision is the basis for more sophisticated measurement system analysis, such as Gauge R & R.
Gauge R & R and other measurement system analysis tools can be easily done using software like Minitab. However, interpreting the results requires a deeper understanding of the concepts.
